
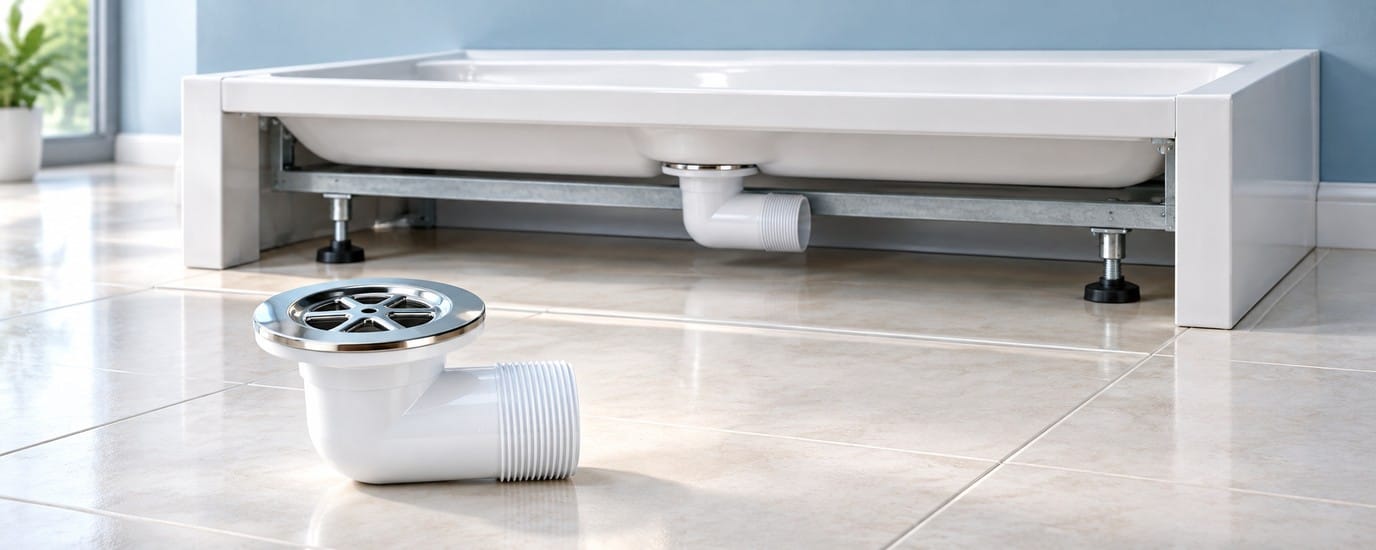
The supplied shower waste plug is a small part of an Aeros shower, but it plays an important role. It collects water at the base and provides the outlet your plumber connects to the drainage system.
The Aeros fitting has a 50 mm horizontal outlet. This lets the pipe leave sideways beneath the base. Your plumber can then plan a route towards a suitable wastewater connection, rather than treating the fitting as a straight drop through the floor.
That sideways outlet is useful when planning a bathroom renovation, a laundry shower or a new room layout. The best route depends on the floor, the available space and where the wastewater drainage is located.
This guide explains the supplied shower waste plug and five shower drainage options to discuss with your plumber. It will help you plan the shower position before you order or start preparing the room.
Quick answer: the supplied fitting provides a 50 mm horizontal outlet beneath the shower base. Waste pipe and couplings are not included. The pipe, couplings, suitable trap and final wastewater connection must be selected for the installation. The fitting alone does not make every existing drain suitable.
In this guide
- What is the supplied shower waste plug?
- Five drainage situations at a glance
- 1. A suitable connection beneath the floor
- 2. A connection away from the shower outlet
- 3. Adding a shower near a laundry trough
- 4. Taking the pipe through an external wall
- 5. Using a suitable macerator
- What to check before installation
- Testing and future access
- Frequently asked questions
What is the supplied shower waste plug?
In this guide, “waste plug” means the drainage fitting supplied for the shower base. It is the part shown on our 50 mm horizontal shower waste plug product page.
The fitting has a stainless-steel grate, rubber gasket, fastening screw and a right-angle body. Water enters through the grate and leaves through the externally threaded horizontal outlet beneath the tray.
This is useful because the outlet gives your plumber a sideways starting point for the drainage pipe. From there, the route may travel towards a floor connection, an appropriate nearby wastewater pipe or another suitable arrangement.
The shower waste plug outlet can be aimed during installation to face the planned pipe route. Agree on that direction before the final connections are made.
A shower waste connection involves more than the base fitting. Your plumber also needs to consider the pipe route, connections, trap arrangement and access for future work. Our shower cubicle with base guide explains the difference between the supplied shower components and the site plumbing.
How does the shower waste plug connect to the pipe?
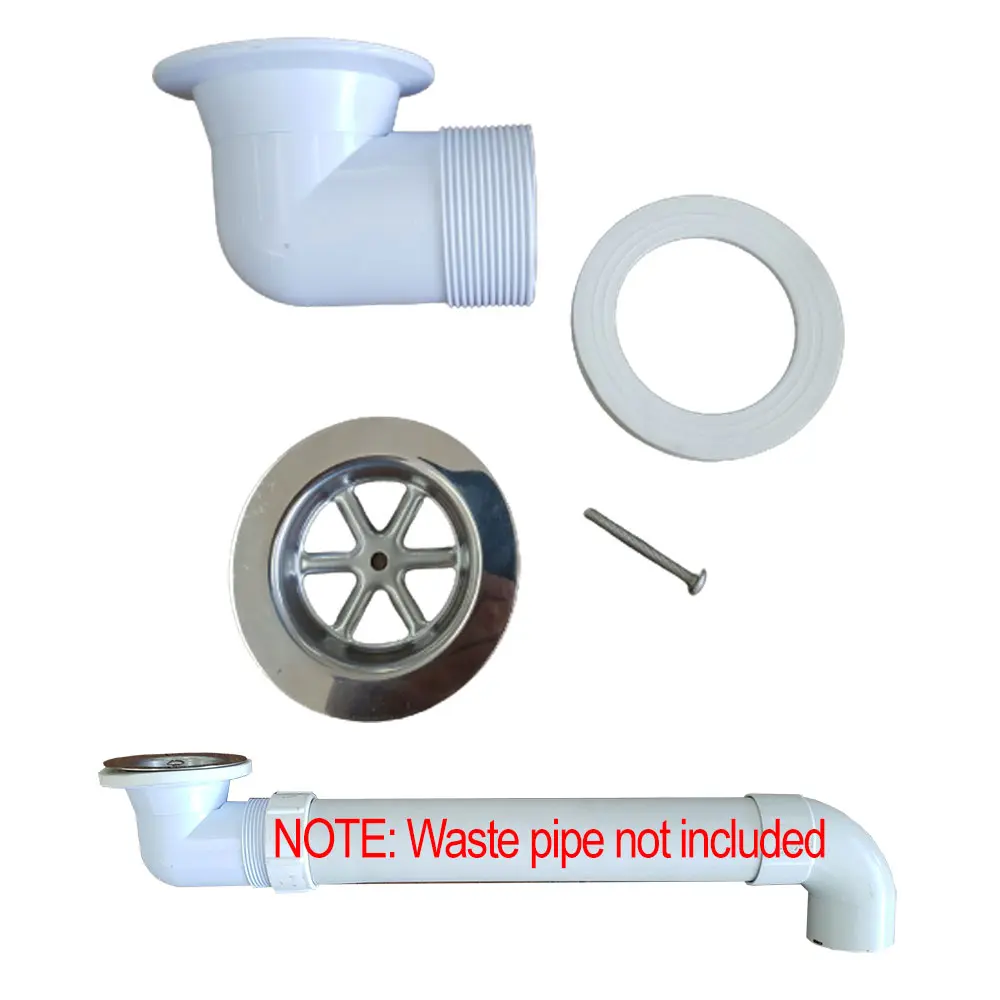
Our connection picture shows a straight pipe extending sideways from the fitting, followed by an elbow that turns the pipe downwards. This is a sideways-then-down arrangement: water leaves the supplied fitting horizontally before the added pipework changes its direction.
The picture also states “NOTE: Waste pipe not included.” Waste pipe and couplings are not included. The pipe and downward elbow shown in that example are additional site plumbing. Your plumber selects the parts and final route to suit your room.
The downward turn in the picture belongs to the added pipework. The supplied body remains the right-angle fitting that sends water sideways beneath the base.
Do not choose the shower position by looking at the visible grate alone. Check the outlet beneath the base and the dimensions for your selected model. Shower shapes and sizes can have different layouts, so measurements from another model may not apply.
Five shower drainage options at a glance
| Your situation | A route your plumber may assess | Main thing to check |
|---|---|---|
| There is suitable drainage beneath the shower area | Pipe from the horizontal outlet to a connection through the floor | Access, room for fittings and the correct connection |
| The existing connection is offset | A sideways pipe route beneath the base towards that connection | Distance, available height and drainage fall |
| You are adding a shower to a laundry | Connection into suitable nearby wastewater drainage | Whether the existing pipework can accept the shower |
| Suitable wastewater drainage is outside the room | A planned pipe route through an external wall | Where the pipe will connect and how it will be protected |
| A gravity route cannot be achieved | A suitable shower macerator system | Flow, lift, pipe route, power requirements and service access |
These are planning options. Your plumber needs to check the actual room and pipework before confirming one.
1. A suitable connection beneath the floor
Some rooms already have a usable wastewater connection close to the planned shower. Others have access beneath a raised or suspended floor, allowing a new connection to be considered.
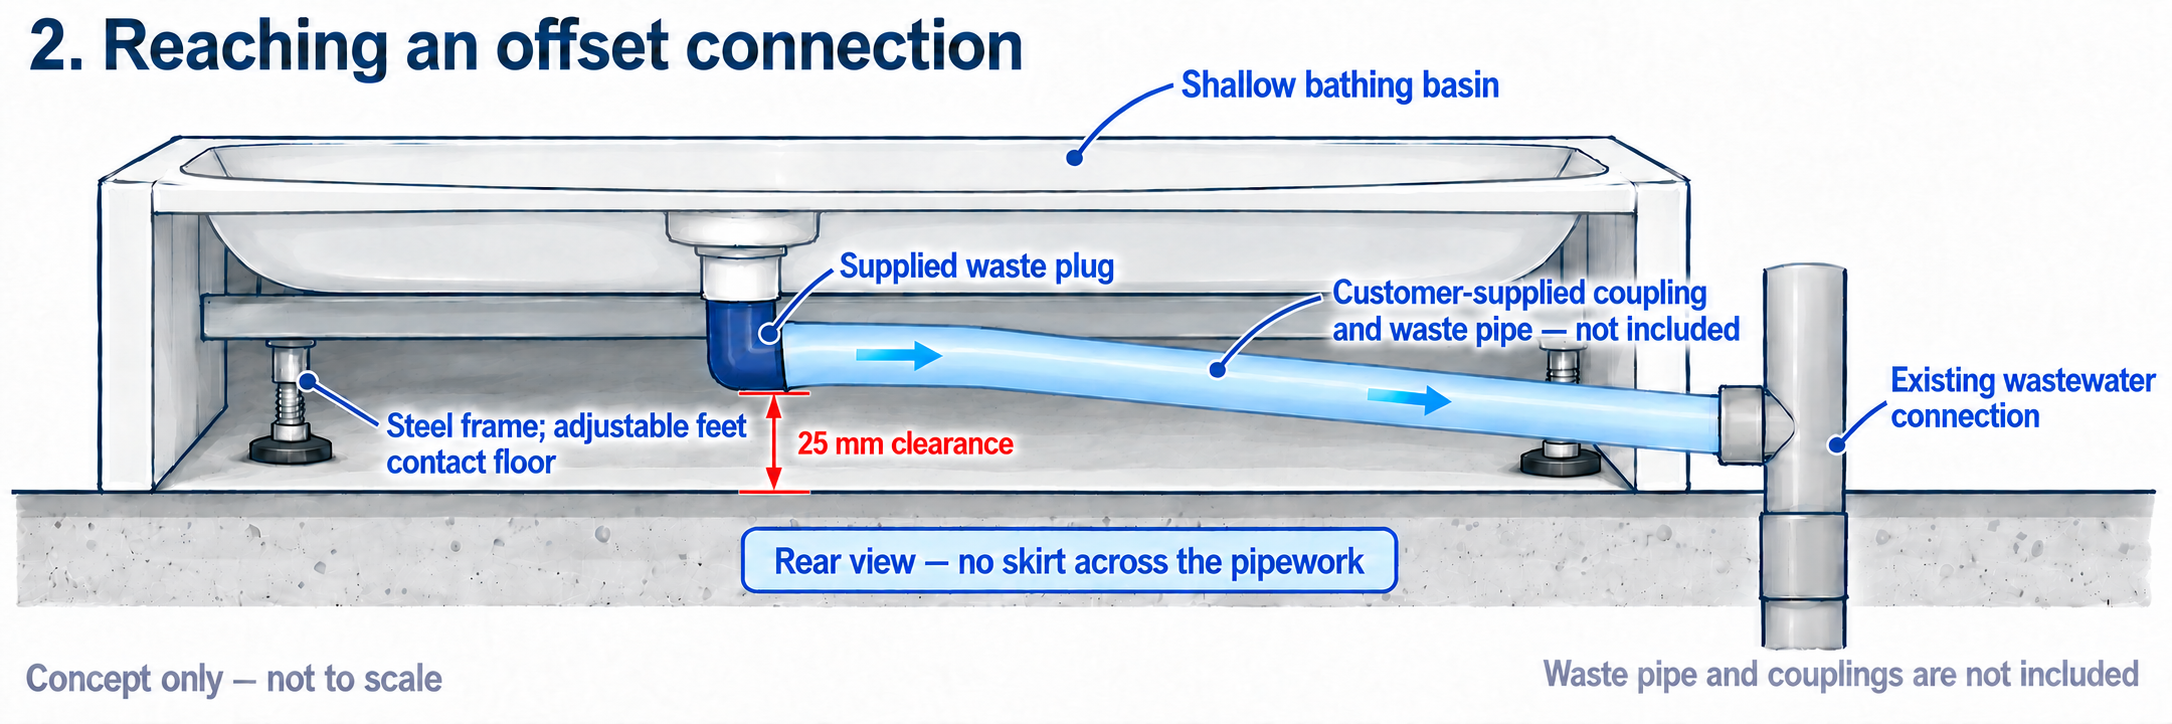
The Aeros shower waste plug sends water sideways beneath the base. The pictured straight-pipe-and-downward-elbow arrangement illustrates one way extra pipework can change that direction towards the floor. Your plumber plans the actual route and connections. Even a short route needs enough space for the required fittings and trap arrangement.
Before the shower is placed in its final position, check how the pipework will be reached. A room with access underneath presents different options from a solid slab with no access below.
Example: you are replacing a shower in a bathroom with accessible plumbing below the floor. The plumber can inspect the existing connection, check whether it can be reused and plan the link from the Aeros outlet.
An old shower connection is a helpful starting point. Its position and condition still need checking. Do not assume that a floor grate or an opening left by the old shower is ready to connect to the new fitting without further work.
2. The existing connection is away from the outlet
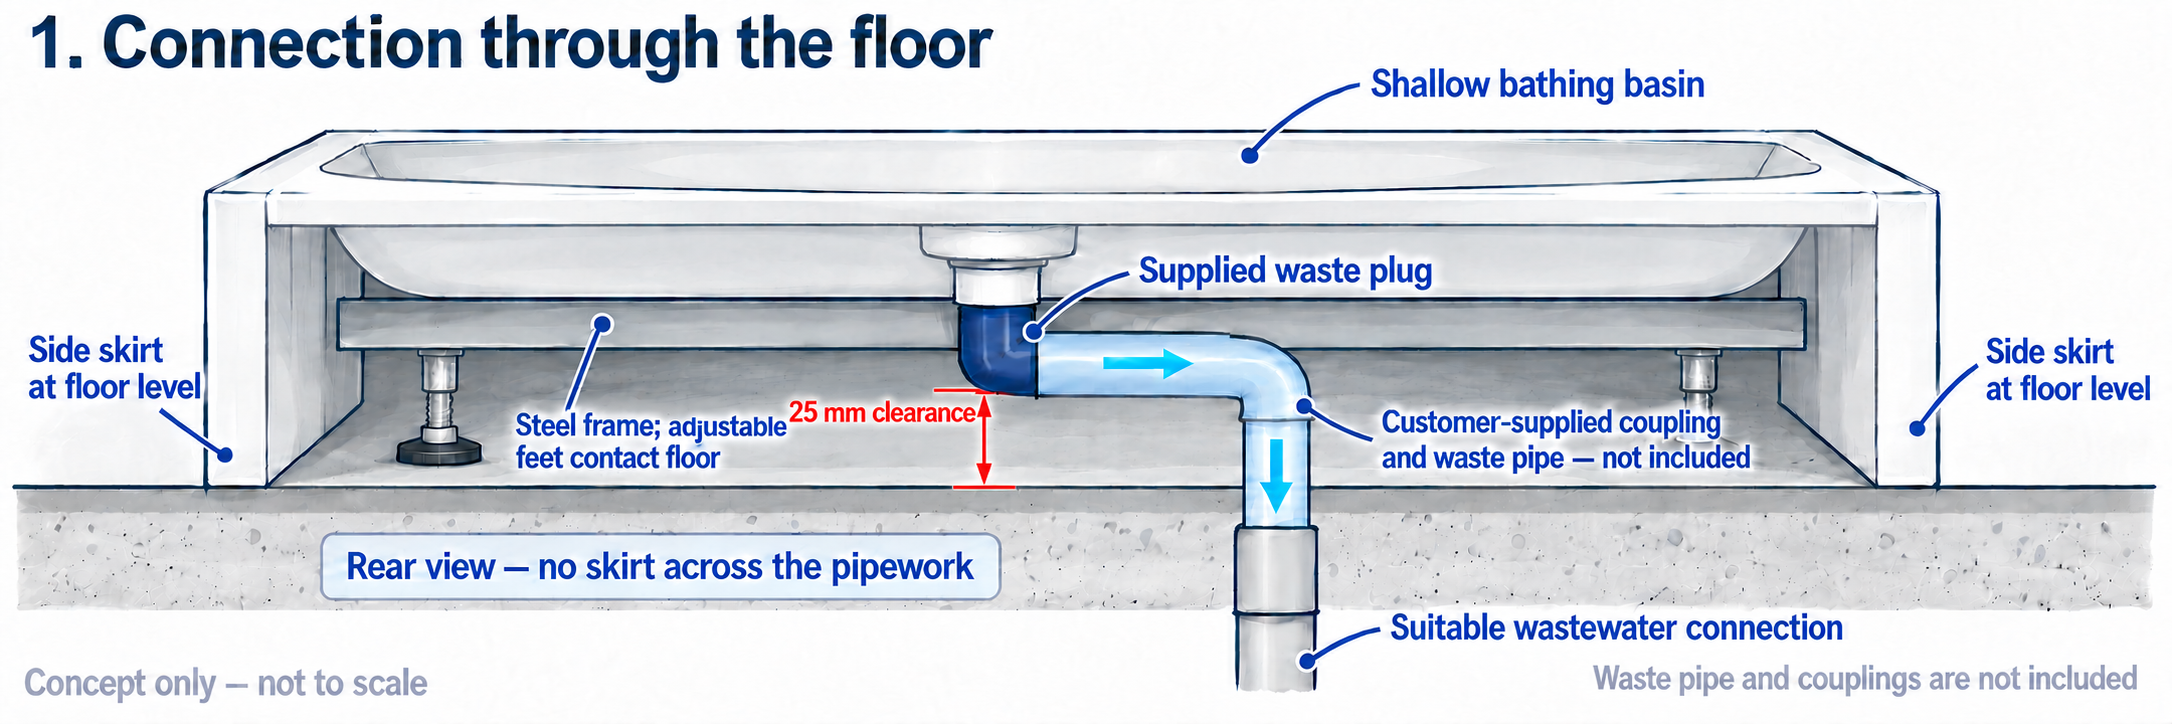
The old drain may not line up with the shower waste plug outlet on the new base. This is one situation where a horizontal shower waste plug can be useful.
It gives the plumber a sideways outlet to work from. If the available space and drainage arrangement allow it, the pipe can travel beneath the base towards a suitable connection.
Water needs a suitable fall along a gravity drainage route. There also needs to be room for the pipe, fittings and connections. A pipe that appears to fit in a photograph may not have enough working space once everything is assembled.
Example: the preferred shower position puts the waste outlet to one side of the existing connection. Your plumber measures the offset and available height, then decides whether the connection can be reached beneath the base.
This approach can offer more layout options. It is not a promise that every offset can be bridged or that floor work will always be avoided. A long run or a connection at the wrong height may require a different plan.
Ask your plumber to assess this before the room layout is final. It is much easier to adjust a plan than to discover a drainage problem after other work is complete.
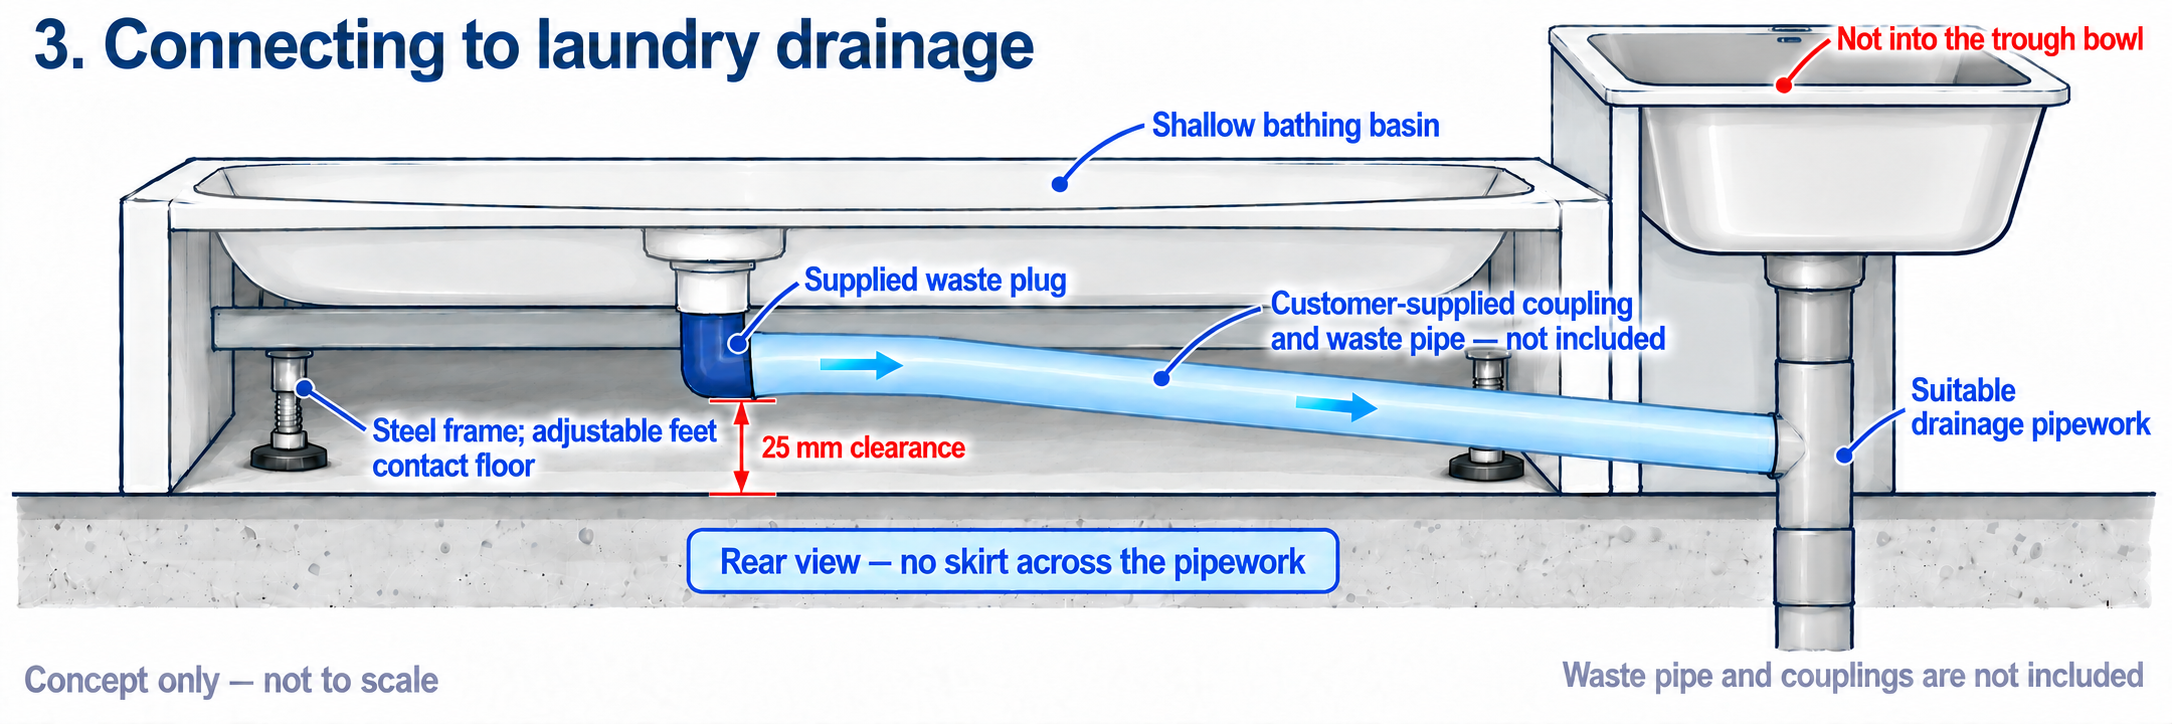
3. Adding a shower near a laundry trough
A laundry often has water supplies and wastewater drainage nearby. This makes it a useful room to assess when you want an extra shower without creating a separate bathroom from scratch.
The shower waste plug’s horizontal outlet may allow a pipe route towards suitable laundry drainage. Your plumber must check the existing pipework, the connection arrangement and whether a suitable fall can be achieved.
The intended connection is into appropriate drainage pipework. The shower should not simply discharge into the trough bowl.
Example: an Aeros shower is being considered beside a laundry trough. The plumber checks the distance between the shower outlet and the available wastewater connection, then assesses the route and any changes needed.
The water supply and the waste connection are separate parts of the job. Having hot and cold taps nearby does not, on its own, establish that the shower can drain correctly.
Our laundry and bathroom combination guide covers the wider room-planning questions. For the supply side, see our guide to shower plumbing connections.
Keeping these two decisions separate helps make the project clearer: first confirm where the water will come from, then confirm where the used water will go.
4. Taking the drainage pipe through an external wall
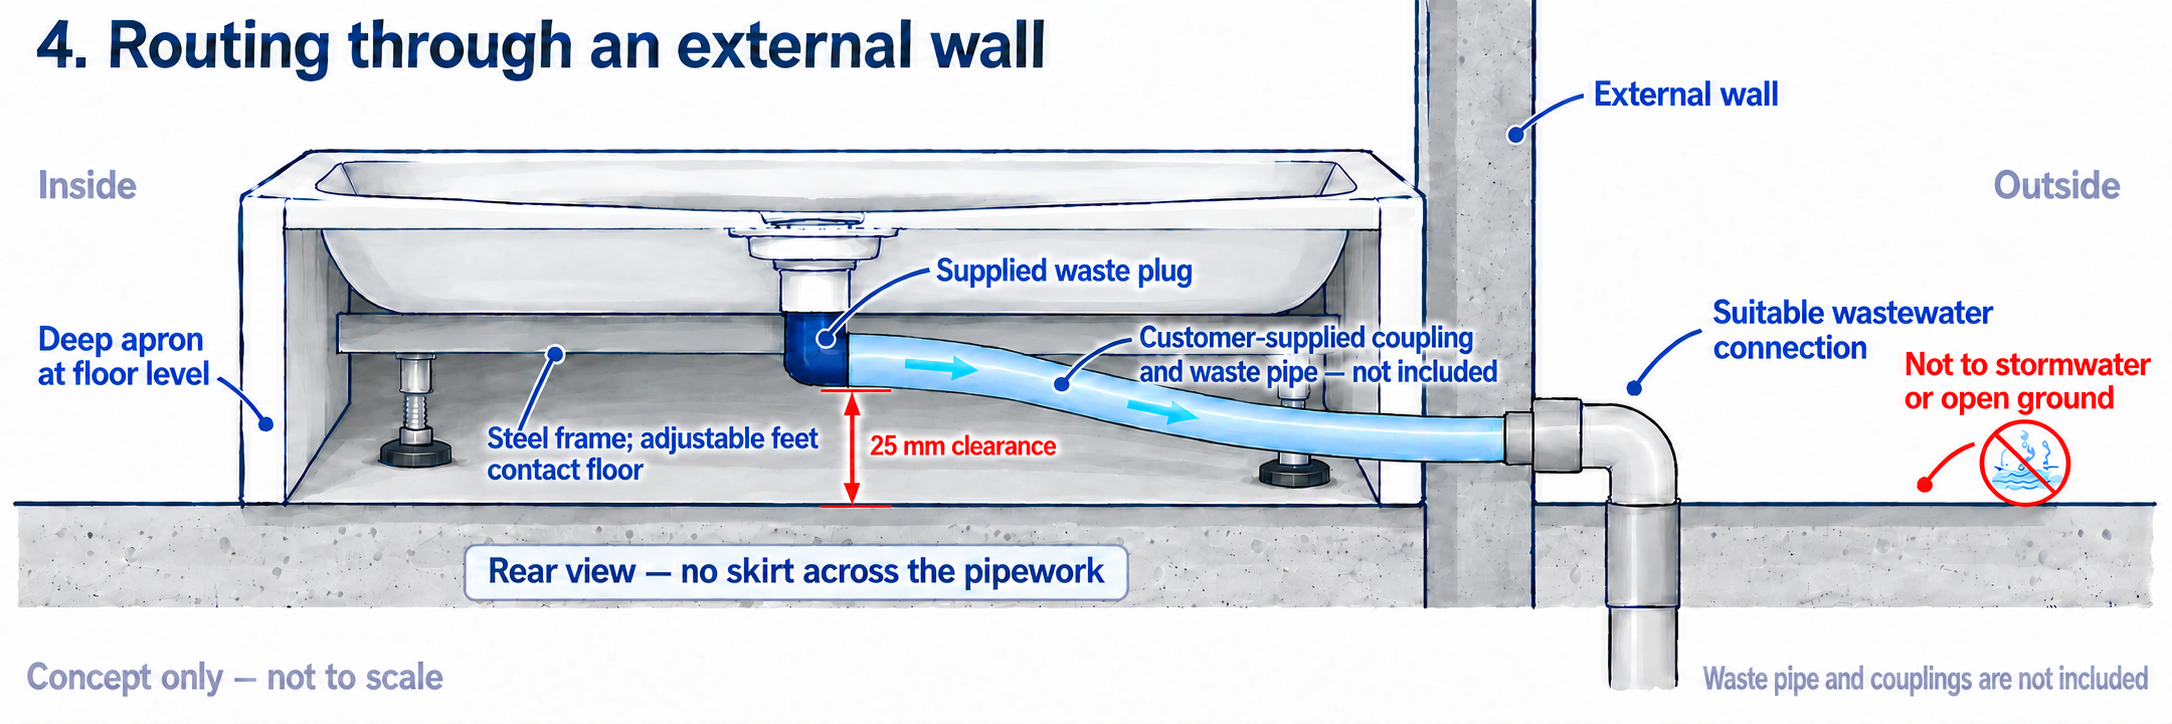
In some layouts, a route through an external wall may lead towards suitable wastewater drainage. The shower waste plug’s horizontal outlet can provide a useful starting direction beneath the base.
Your plumber needs to assess the whole route, including the wall opening, available fall, pipe protection and final connection. The location of the shower inside the room is only part of this decision.
Example: the shower is planned against an outside wall, with appropriate wastewater drainage available nearby. The plumber assesses whether a route through the wall is suitable for that building and connection.
Shower wastewater must go to an appropriate wastewater drainage system. Running a pipe outdoors does not mean it can discharge onto the ground or into stormwater drainage.
This option may be worth discussing when a floor route is difficult. It still depends on the building and the drainage outside. Confirm the proposed connection rather than choosing this option only because the wall is close.
5. Using a suitable macerator when a gravity route is not practical
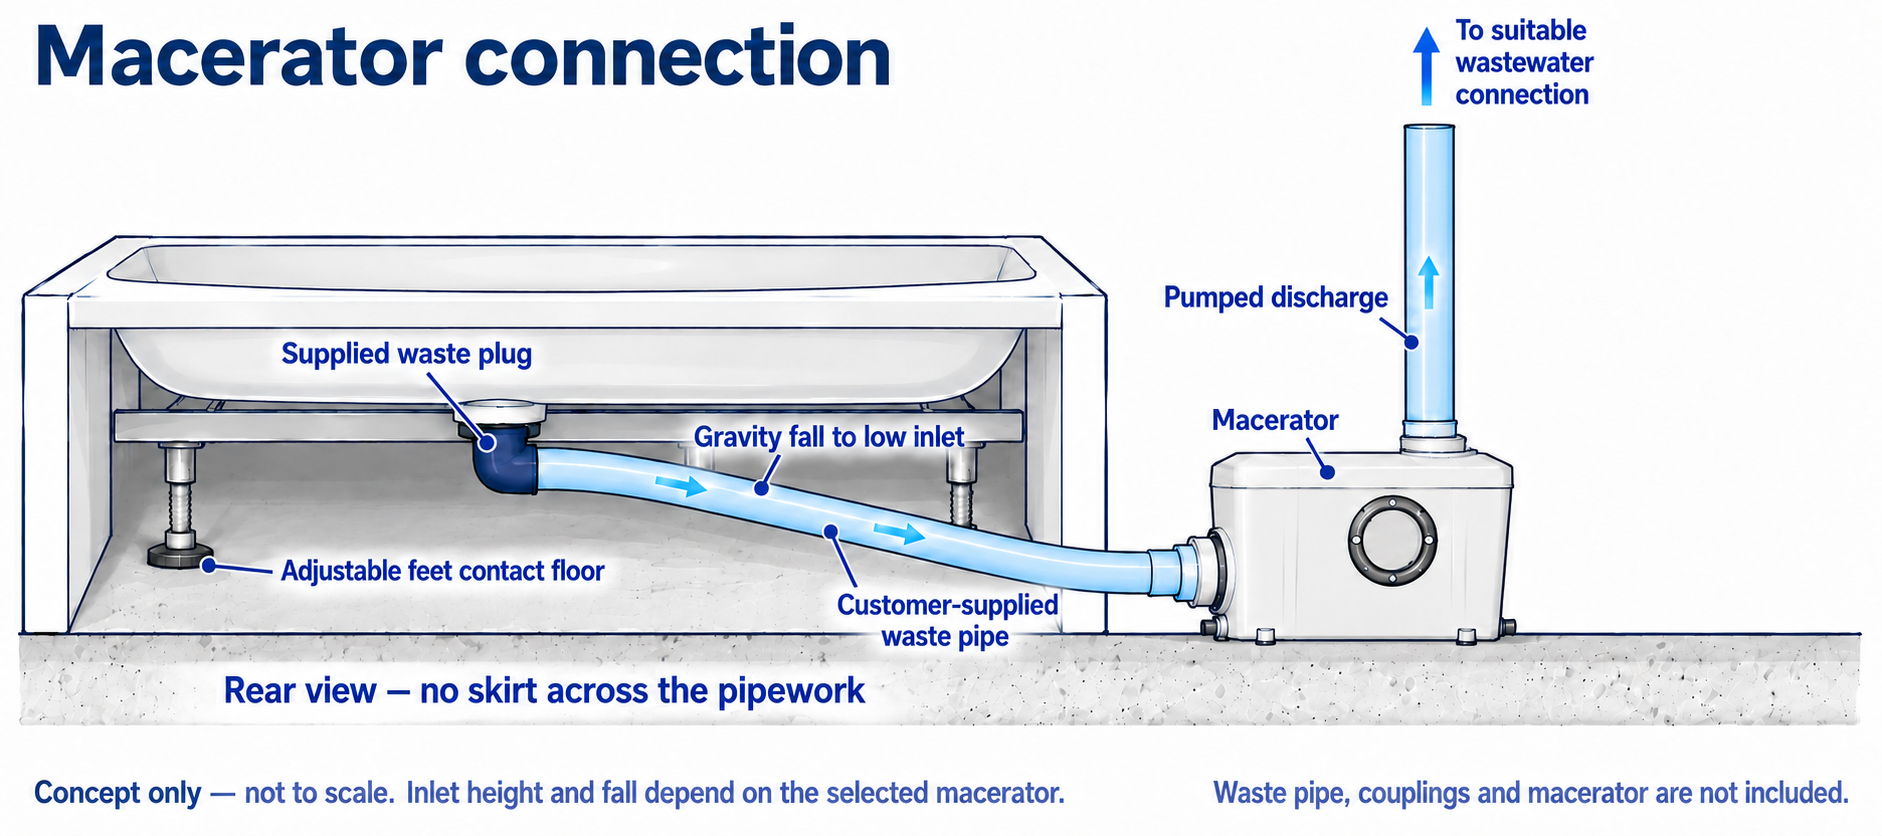
Sometimes the nearby drainage is too high, too far away or otherwise unsuitable for a practical gravity connection. A suitable macerator may be an option for the plumber to assess.
The macerator must be suitable for shower wastewater and the planned installation. Selection depends on factors such as the shower flow, required lift, pipe route and the manufacturer’s installation requirements.
There still needs to be suitable height and fall between the shower waste plug outlet and the macerator inlet. The required arrangement depends on the selected macerator. A macerator cannot make up for every problem beneath the tray.
Example: a proposed shower cannot drain by gravity to the available wastewater connection. Rather than assuming the room cannot work, the plumber can assess a suitable macerator arrangement and explain its space, power and maintenance needs.
The supplied shower waste plug does not include a macerator. A macerator also does not remove the need for an appropriate final wastewater connection.
Plan service access from the beginning. The equipment needs to remain accessible for inspection and maintenance. Your plumber should also explain how the system is operated and what to do if it stops working.
Where gravity drainage can be achieved, ask the plumber to compare it with any proposed macerator arrangement so you understand the work and ongoing care involved.
What to check before installing the shower waste plug
Take these points to your plumber before the shower is assembled:
- The exact shower model. Use its dimensions and assembly information, rather than measurements from a similar-looking base.
- The proposed position. Show where the shower will sit and which walls it will face.
- The existing drainage. Identify the available wastewater connection and whether it can be inspected.
- Space beneath the base. Allow for the actual fitting, pipe route, trap and couplings. Do not plan using the pipe diameter alone.
- Floor construction. A concrete slab and an accessible suspended floor can lead to different options.
- Future access. Consider how the grate, connections and any macerator equipment will be reached later.
Photographs can help with the first discussion. Include the full room, the proposed shower position and any visible drainage. Your plumber may still need a site inspection before confirming the arrangement.
For cubicle assembly, follow the instructions for your model in our assembly guides. Let the drainage plan guide the preparation, rather than leaving the waste connection until the end.
Check the shower waste plug connections before regular use
Once the plumbing is connected, have the installation checked for leaks and proper drainage before the shower enters regular use.
Water should leave the tray through the planned route. The plumber should check the connected fittings and confirm that the drainage arrangement is working as intended. If a macerator is used, its operation needs checking too.
Keep the relevant model instructions and product information with your records. Knowing which fitting and drainage arrangement you have will make future questions easier to answer.
For routine care, follow the supplied instructions and keep the visible grate clear. If water starts draining more slowly, investigate the cause rather than assuming the supplied fitting needs replacing. The issue could be elsewhere along the drainage route.
Shower waste plug FAQs
Is the shower waste plug supplied with an Aeros shower?
The waste fitting is included with the shower base package described in our inclusions guide. Waste pipe and couplings are not included. The site pipework, suitable trap, couplings and final drainage connection are part of the installation planning. Check the inclusions for your selected model before ordering.
What size is the shower waste plug outlet?
The Aeros horizontal shower waste plug has a 50 mm outlet. Your plumber needs to check the matching pipework and fittings for the installation.
Does the drain need to be directly beneath the grate?
The fitting has a horizontal outlet, allowing your plumber to assess a sideways route beneath the base. The possible route depends on the space, fall and available wastewater connection.
Can the shower waste plug connect to my laundry drainage?
That may be possible where the existing drainage and pipe route are suitable. Ask your plumber to assess a connection into the wastewater pipework, not a discharge into the trough bowl.
Can the pipe go through an outside wall?
Your plumber may consider this where it leads to an appropriate wastewater connection. It must not simply discharge outdoors or into stormwater drainage.
Will I need to cut the concrete floor?
That depends on the existing drainage and the route your plumber confirms. The horizontal outlet provides options to assess, but it cannot guarantee that slab work will be avoided in every room.
Is a macerator always needed?
No. A suitable gravity route may be available. A macerator is an option to assess when gravity drainage cannot be achieved, with the macerator selected for the installation.
Plan the drainage around your room
The supplied shower waste plug is a useful part of the Aeros shower system. Its sideways outlet gives your plumber a starting point for several different drainage layouts.
Choose your preferred Aeros shower cubicle, check the model information and confirm the waste route before installation. With those details settled, you can plan the room and assembly with much more confidence.