
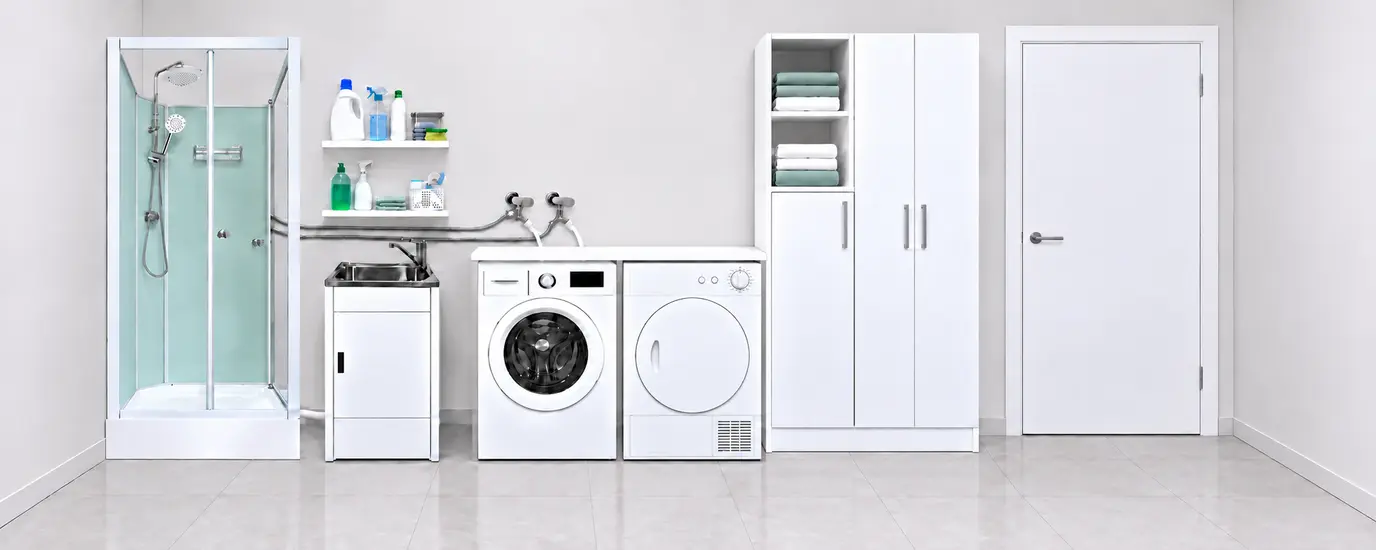
A laundry bathroom combo can give your household an extra place to shower without building another room. Before committing to a full laundry renovation, compare constructing a tiled shower with installing a complete, grout-free Aeros cubicle.
The biggest saving can come from the building work you avoid. An Aeros shower brings its own base, wall panels, doors and shower fittings. In a suitable existing laundry, it can be assembled in the available space and connected to the water supply and drainage, reducing the need to open walls, rebuild surfaces and tile a new shower.
This guide explains laundry renovation cost differences, installation time, small-room planning and future removal. It also includes a real customer’s historical renovation and practical installation estimates supplied by Aeros.
Can you add a shower to a laundry?
Yes. A laundry can accommodate a shower when there is enough usable space and suitable water and drainage connections. An Aeros cubicle forms the showering enclosure itself, so you do not have to construct its internal walls and base as a tiled shower.
Start by asking what you need the room to do. A second shower can help a busy family, provide a place to wash after gardening or give visitors another option. You may want to retain your washing machine and trough, or change their positions to make better use of the room.
Keeping existing services close to the new shower can reduce plumbing work. The best layout makes the laundry easier to use while leaving enough space to enter the shower, load the washing machine and reach the taps.
A suitable floor, practical ventilation and an agreed plumbing route are part of that plan. Have the installer confirm any room-level requirements before ordering; a complete shower enclosure does not resolve every issue in an unsuitable room.
How can you install a shower in a laundry using existing taps and trough drainage?
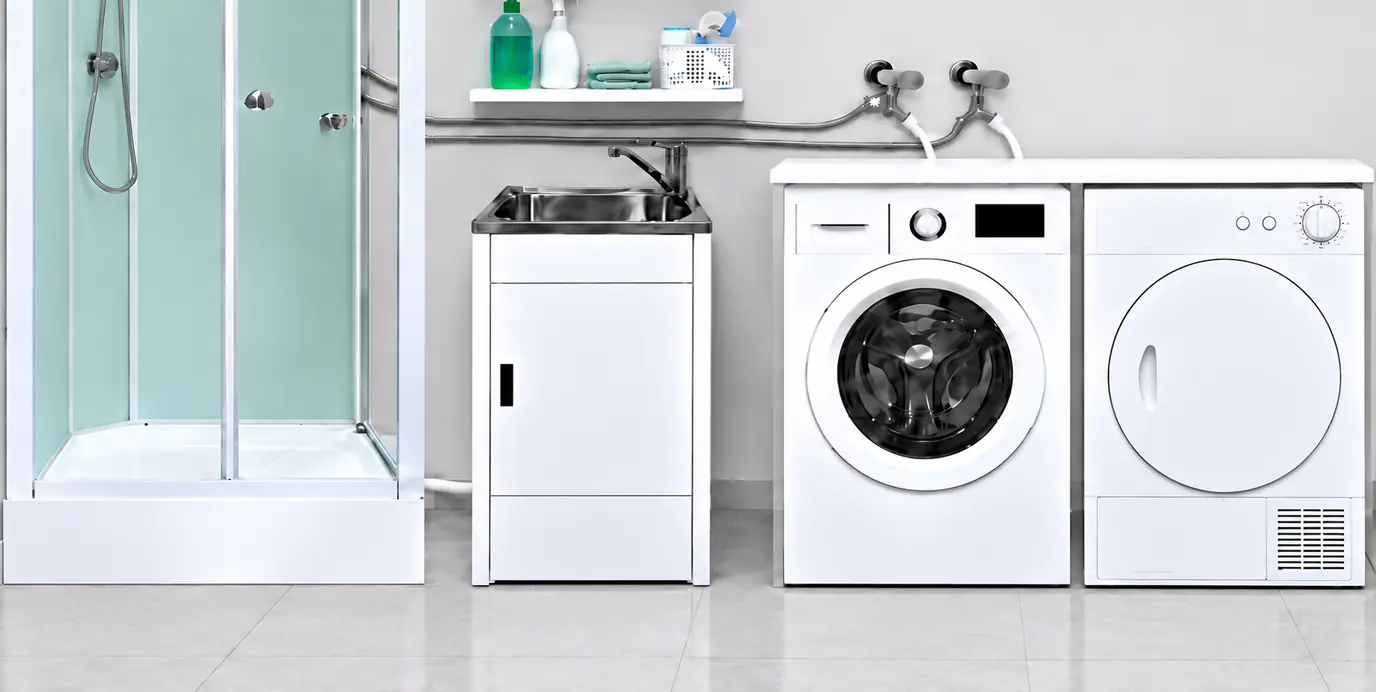
One possible way to add a shower to a laundry is to share the existing washing-machine water supplies and connect the shower waste to suitable laundry trough drainage. In the illustration, a Y-shaped splitter attaches directly to the outlet of each hot and cold mini stop above the washing machine. One outlet on each splitter supplies the washing machine through its white hoses. The other outlets supply two separate stainless-steel braided hoses, which run beneath the shelf and behind the shower to its hot and cold mixer inlets. Using the existing tap outlets can save time and labour by avoiding opening walls, running new concealed supply pipes, and repairing or repainting the disturbed surfaces.
The shower’s horizontal waste plug provides a sideways outlet for a waste pipe to run towards the laundry trough’s drainage pipework. The low pipe shown between the shower and trough illustrates this route. Where the connection height allows sufficient fall towards the drain, this arrangement can avoid cutting the concrete floor to install a new drain directly beneath the shower. A licensed plumber needs to confirm the available fall, pipe sizing, trapping and suitable connection to the trough drainage; the shower wastewater connects into the drainage pipework, rather than emptying into the trough bowl. For a suitable laundry bathroom combo, combining these existing water and drainage connections can reduce building work, installation time and disruption.
Which laundry renovation jobs can an Aeros shower avoid?
Compare the work needed to create the finished shower, rather than looking only at the price of a screen or tray. Conventional construction may involve several separate trades and visits. Aeros supplies a coordinated enclosure with its own shower surfaces.
| Work to compare | Building a tiled shower | Aeros in a suitable existing laundry |
|---|---|---|
| Water supply | May involve opening walls for concealed pipes, then repairing and finishing them. | Existing laundry supplies may be usable with suitable splitters and connection hoses. |
| Shower walls | Prepare or replace lining, apply the specified membrane system, tile and grout. | Assemble the supplied shower panels; no tiled shower walls to construct. |
| Shower base | Construct or fit a base and complete the surrounding shower finishes. | Position and level the supplied reinforced base. |
| Screen and fittings | Select, buy and fit separate compatible components. | Assemble the doors and fittings included with the chosen model. |
| Drainage | Route the waste; access may involve the slab or space beneath the floor. | Plan a route from the horizontal outlet to suitable drainage, with a pump where needed. |
| Room repairs | Allow for repairs caused by demolition and service installation. | Less repair work where existing surfaces and connections can be retained. |
| Future removal | Dismantling a built-in tiled shower can involve further demolition. | The cubicle can be dismantled and removed; deal with any altered connections or penetrations. |
Every avoided task can remove labour, materials or waiting time from the project. You can still choose new flooring, cabinetry or decoration, but those choices can be budgeted separately from the shower installation.
How much does adding a shower to a laundry cost?
The total depends on the shower you choose, the plumbing route and how much of the room you change. With Aeros, ask for the cubicle price, delivery, assembly, connection materials and plumbing as separate items. That gives you a clear basis for comparing quotes.
A published Passion Built laundry conversion guide, dated June 2023, gives $15,000–$20,000 for a laundry conversion including a shower and toilet. It also gives a separate $1,500–$10,000-or-more range for adding a shower. These are different scopes, not a current quote for your room. The article describes demolition, plumbing, membrane work, tiling and separate fixtures.
Aeros can reduce the work required to add the shower itself. Where the room and connections already suit, your budget does not need to include building a new tiled enclosure. Keeping the trough, washing machine and existing finishes can further limit the scope.
| Include in your Aeros budget | What to establish |
|---|---|
| Cubicle and freight | Selected model, size, current price including GST and delivery to your address. |
| Assembly | Who will assemble it and the agreed charge, if any. |
| Water connections | Suitable splitters, isolation arrangements, hoses and plumber’s labour. |
| Waste connection | Route, pipework, fittings, access and labour. |
| Pumped drainage, if needed | Suitable pump, installation, power arrangements and servicing access. |
| Optional room changes | Cabinetry, trough relocation, floor repairs, ventilation or other agreed work. |
Potential saving = a comparable tiled-shower quote minus the complete Aeros installation quote. Compare the same outcome. A full room renovation with a new toilet and cabinetry cannot be compared directly with a shower-only installation.
This approach makes laundry renovation cost easier to understand: you can see what is supplied, what must be connected and which building tasks disappear from your quote.
How long does it take to install a laundry shower?
Aeros estimates about 4 hours 20 minutes to 6 hours 20 minutes of combined working time for straightforward assembly and connections. These are practical estimates supplied by Aeros, not a guaranteed completion time or a fixed plumbing quote.
| Task | Aeros working-time estimate |
|---|---|
| Fit suitable tap splitters and supply hoses | About 20 minutes |
| Set up the waste and straightforward drainage | About 1–2 hours |
| Assemble the shower | About 3–4 hours |
| Combined working time | About 4 hours 20 minutes–6 hours 20 minutes |
The tasks may be completed by different people. Access problems, new drainage, a pump, repairs or extra room work can add time. Your installer should confirm the sequence and when the shower will be ready to use.
For a tiled shower, the programme may include demolition, plumbing, lining, membrane application, curing, tiling, grouting and fitting the screen. Work and drying periods have to be coordinated. Aeros avoids constructing those tiled surfaces inside the enclosure, which can reduce both trade visits and disruption.
Where the installation time goes
Estimated working time supplied by Aeros. Each track represents four hours; the lighter part shows the upper estimate.
Combined working time: about 4 hours 20 minutes–6 hours 20 minutes. Extra work and scheduling can extend elapsed time.
Can a shower use the washing-machine taps?
Yes. The method Aeros uses takes water from the existing washing-machine taps by fitting a splitter directly onto each tap’s threaded outlet. One splitter goes on the hot tap and another on the cold tap. These are the exposed outlets where the washing-machine hoses normally connect, so the connection work takes place outside the wall.
Where do the splitters and hoses connect?
Each Y-shaped splitter turns one tap outlet into two connection points. This lets the laundry supply serve the washing machine and the shower. The plumber sets up the connections as follows:
- Fit the splitters to the existing taps. With the water isolated, the plumber disconnects any washing-machine hoses and attaches a suitable splitter directly to the threaded outlet of the hot tap and another to the cold tap.
- Reconnect the washing machine. Its hose connects to one branch of the relevant splitter. The other branch provides the shower connection. The arrangement is matched to whether the washing machine uses cold water only or both hot and cold supplies.
- Run two stainless-steel braided supply hoses to the shower. A hose from the hot tap’s splitter connects to the shower mixer’s hot inlet. A second hose from the cold tap’s splitter connects to the mixer’s cold inlet. The hoses need to be long enough to reach the mixer along the planned route.
- Check the completed connections. The plumber selects fittings and hoses suitable for the installation, keeps connections accessible, and checks for leaks and correct operation.
The connection path is simple: existing hot and cold laundry taps → splitters on the tap outlets → separate hot and cold braided hoses → the shower mixer. Mixer licence: WM-020209. The washing machine keeps its own connection on the other branch where required.
How does this method save time and money?
The hot and cold water pipes already reach the laundry taps. Using those exposed outlets can avoid opening the wall to access the cavity and running new concealed supply pipes to the shower position.
Where this arrangement suits the room, the water-supply work can therefore avoid cutting out wall lining, installing new pipe runs inside the wall, replastering, patching and repainting or replacing disturbed tiles. You also avoid coordinating those wall-repair stages and waiting for their finishes to dry.
Aeros estimates about 20 minutes to fit the splitters and supply hoses in a straightforward, accessible installation. That estimate covers this water-connection task only. Shower assembly and waste drainage are separate: Aeros estimates about 3–4 hours for assembly and 1–2 hours for straightforward waste and drainage work.
For a laundry bathroom combo, this is a practical way to reduce both labour and disruption: use the water supply already available at the taps and connect it to the supplied shower mixer. Send photographs of the taps, the proposed shower position and the distance between them so the plumber can assess the hose route and quote the work.
Can you install a shower without cutting the concrete floor?
Sometimes. The Aeros horizontal waste outlet allows the plumber to consider drainage routes other than a new connection directly below the shower. Whether slab cutting can be avoided depends on the available drain, height, access and required fall.
The routes Aeros describes include a suitable connection to the laundry trough’s waste pipework, access through the floor, or a route through an exterior wall to suitable external wastewater drainage. The shower must discharge into the appropriate drainage system, not onto the ground or into a stormwater outlet.
Where gravity drainage cannot work, a suitable shower wastewater pump or macerator system may provide another option. The plumber needs to select it for the shower’s flow, discharge route and lift, with access for servicing. Include the pump and any associated electrical work in the quote.
Drainage is essential with either shower type. The benefit is having more ways to plan the connection before committing to disruptive work. See the 3000 Series buyers guide for an example of the current horizontal waste arrangement.
How do you plan a small laundry bathroom combo?
Measure the usable space and the approach to the shower, not just an empty corner. For a small laundry bathroom combo, mark the proposed cubicle footprint on the floor and check the room with appliance and cupboard doors open.
Current Aeros options include compact square footprints, corner-entry layouts and larger rectangular models. For example, the 3000 Series includes 800 × 800, 900 × 900 and 1000 × 1000 mm sizes. Check the selected model’s actual dimensions and assembly instructions.
- Leave room to enter and leave the shower comfortably.
- Keep the washing-machine door, detergent drawer and laundry trough usable.
- Check ceiling height and any beams or bulkheads.
- Keep water connections and service points accessible.
- Confirm how the cartons and panels will enter the room.
A sliding shower door can help avoid an outward door swing, but you still need standing space at the entrance. If you plan to convert laundry to bathroom use while keeping the washing machine, think about privacy and when each household member uses the room.
Before and after: a customer's laundry renovation
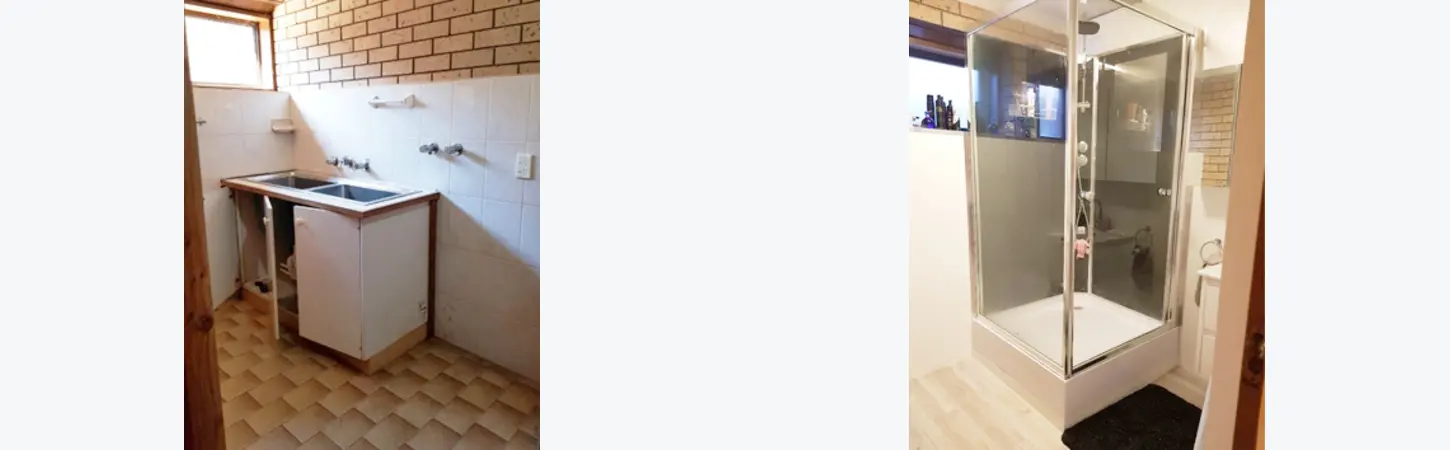
These original customer photographs show an older laundry with a trough and the room after renovation with an Aeros shower. They demonstrate how an existing utility space can accommodate a shower without adding another room to the house.
The shower pictured is an older, discontinued model. Its appearance and fittings should not be used to identify what is supplied with today’s Aeros range. Compare current models and their individual inclusions before ordering.
The photographs also show changes to the flooring and laundry fittings. They illustrate a historical renovation, rather than a measured example of a shower-only installation. We have not attached a cost or installation time to this particular customer’s project.
Can you remove an Aeros shower and reclaim the laundry?
Yes. The cubicle can be dismantled and removed if you later want to use the space differently. This flexibility is a useful part of the laundry bathroom combo decision, especially when your household’s needs may change.
Current Aeros enclosures use clip-lock assembly without screws, glue or silicone at the enclosure joins. You are not building a tiled shower into the room’s surfaces. A plumber can disconnect the services so the cubicle can be removed in accordance with its instructions.
Where installation uses existing connections and leaves the room surfaces untouched, removal can leave those original surfaces intact. If the job creates a new hole for drainage, moves a trough or alters services, allow for making those changes good. “No footprint left behind” depends on how the particular installation was carried out.
Discuss future removal at the quoting stage. Keeping connections accessible and limiting permanent room changes helps preserve that option.
What other savings should you consider?
A grout-free laundry shower removes shower grout joints from your cleaning and repair routine. Smooth panels and glass still need cleaning, and fittings still need care, but there is no tiled enclosure to regrout. Our shower regrouting cost comparison explains that ongoing difference.
Quoting can also be simpler. Aeros reports that the plumbers it uses can quote suitable installations from photographs. The complete cubicle is known; the main questions concern the available space, services and connection work. A plumber may request further information when a route is concealed or uncertain.
To help obtain a useful quote, send a wide room photo, the proposed position and measurements, hot and cold tap photos, the waste connection, and relevant outside or underfloor views. Explain whether you want to keep the existing trough and finishes. Ask for inclusions, exclusions and any extra-work rates in writing.
Laundry bathroom combo FAQs
What is the cheapest way to add a shower to a laundry?
Keeping usable existing services and finishes can reduce the work. Compare a complete Aeros cubicle and its connection costs with constructing a tiled shower. The lowest total depends especially on drainage and any room alterations.
Does a laundry renovation need new shower wall tiles?
An Aeros cubicle supplies its own shower panels, so tiles are not needed to form its internal walls. The installer should separately confirm whether the surrounding room needs any work for the planned use.
Can I assemble a laundry shower myself?
Aeros showers are designed for DIY assembly using the model’s instructions. Arrange the plumbing connections with an appropriately licensed plumber and allow enough people and space to handle the panels safely.
Can a laundry shower connect to the trough waste?
A suitable connection to the trough’s waste pipework may be possible. A plumber must assess the pipework, connection height and drainage arrangement. It is not simply a hose placed into the trough.
Can I add a shower if there is no nearby floor drain?
A horizontal waste route or suitable pumped system may make the installation possible. Establish the discharge location and full connection cost before choosing the shower position.
Will an Aeros shower always leave no marks when removed?
Original surfaces can remain intact where the installation does not alter them. New drainage holes or other room changes may need repair after removal. Plan for that possibility from the start.
Can I still buy the shower in the customer photographs?
No. It is a discontinued model shown as a historical customer example. Choose from the current Aeros range for up-to-date sizes, features and inclusions.
Compare your laundry bathroom combo options with Aeros
Before booking a full laundry renovation, find out how much work is needed to add the shower you actually want. A complete Aeros cubicle can offer fewer construction tasks, a clearer installation scope, grout-free surfaces and the option to reclaim the space later.
Start with room photographs and measurements. Browse the current Aeros shower range, compare the 3000 Series sizes and installation details, and contact Aeros to discuss your laundry layout and suitable installation options.
The useful comparison is the complete cost and disruption of each approach: shower, connections, room changes and future upkeep. That is where the advantages of an Aeros laundry shower become clear.